Showing posts with label fabric. Show all posts

Wednesday, March 2, 2011

sewing for the sick

I'm sorta finished this outfit for my aunty. It's been a hard time photographing it as my husband's not here to take pictures. Apologies, it's not getting the best light or modeling etc, but you get the general idea.


and this is a truer colour representation:


The fabric is a very very light cotton knit, and it's been difficult to work with in some ways. It gets small holes from the needle pricks and any unpicking can cause a bigger hole. It stretches and needs a slight zig-zag stitch, but because it's so fine the fabric tends to pucker, making seams too rigid for the stretch/knit. Needless to say the armholes and shoulder seams have been a bit of a bugger and I've redone them twice.

Pity then, that the next time I sew this pattern, I have more of the same fabric, just a different colour (yes, denim blue, my trend for winter). I also have some red merino knit to make one for a great aunt in Christchurch (she could do with some cheering up after the earthquake), so I hope that'll be easier to work with.

I have overlocked everything, even the raw edges. It has made a big difference to it looking slightly professional (for my standards).

Love the pattern. It's Simplicity 2603. It can be worn about 15 different ways. Some I have modeled for you. Badly, but...

The undertop is also included in the pattern. Only thing is, I used silk (unstretchy) for a pattern that called for a stretch knit. To make up for the lack of stretch I used a M size (to go with a S for the cardy) and added some width and length when cutting out. It has no zip closure, just a pullover style. Hope it fits!


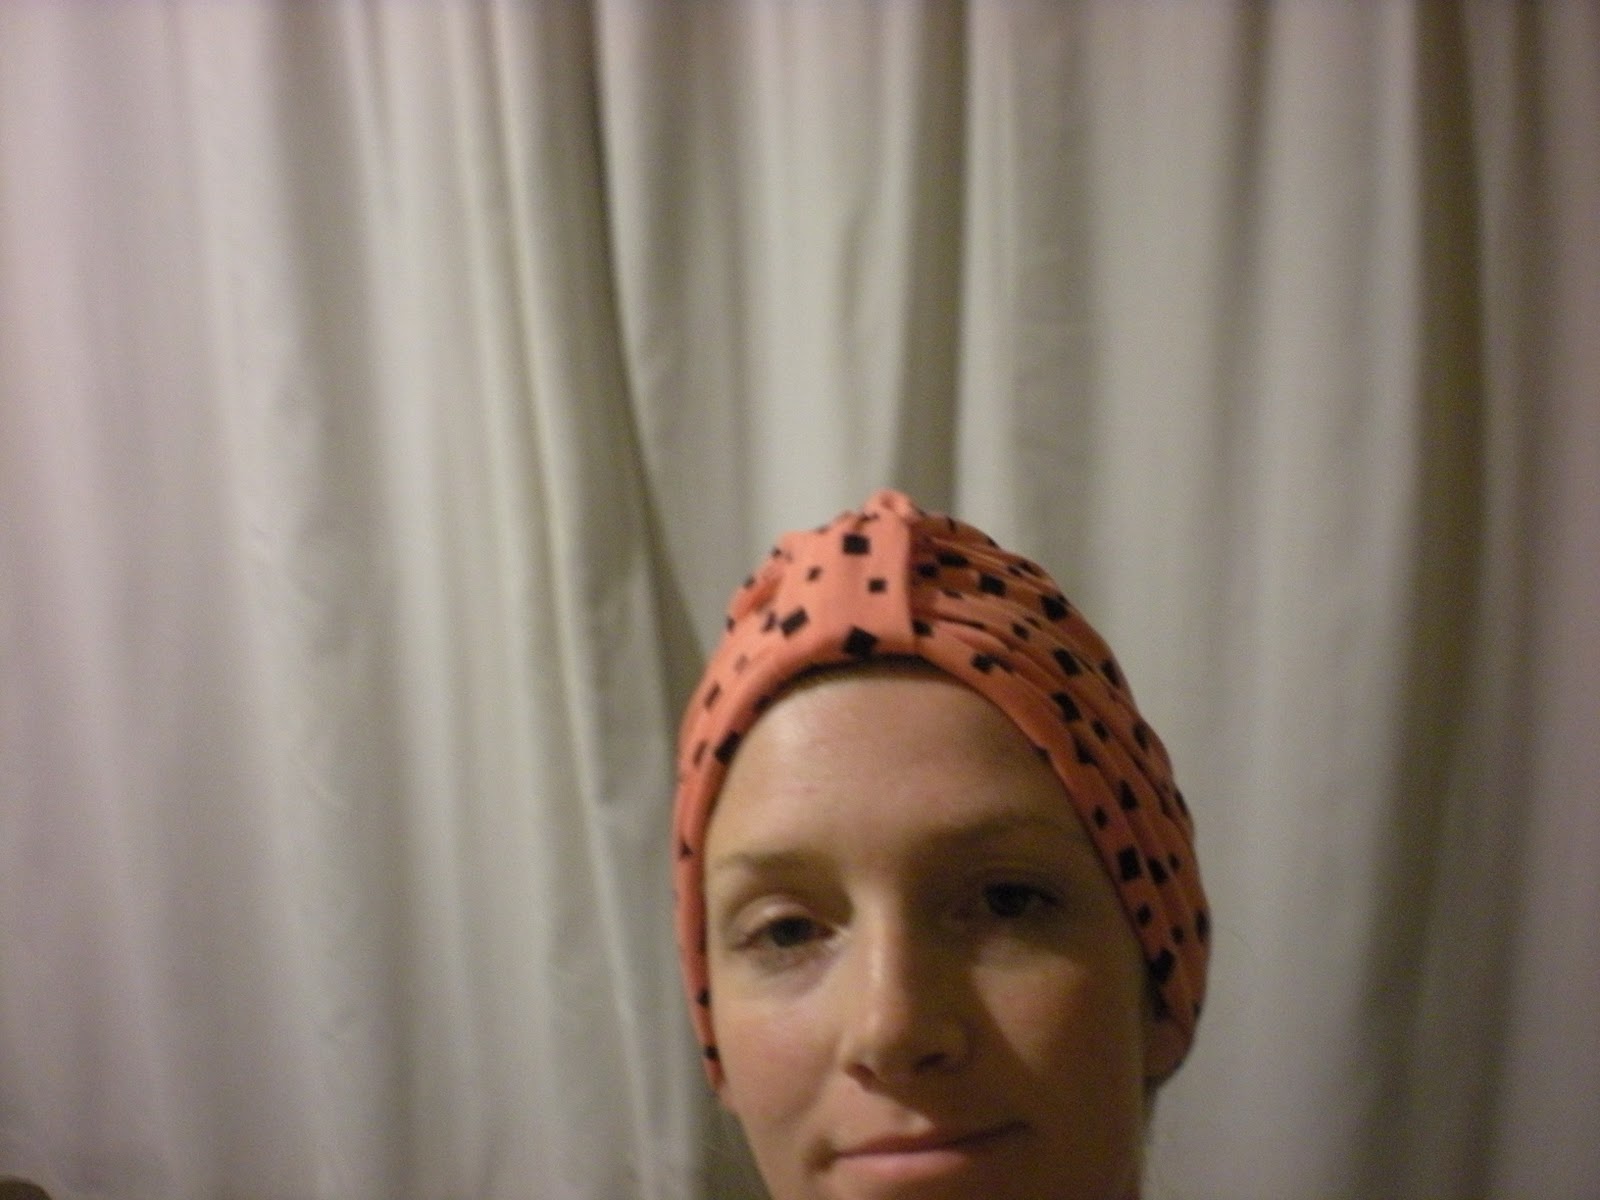
To 'top' it off (gosh I'm funny) I made another chemo turban. The knit fabric was wonderful here, so light, yet warm and stretchy.

I intend to make more of those and drop them off to the hospital or Cancer Society.
Which brings me to these:


Hats for men, well, chemo caps for men. Because men get cancer too. These are easy to make from soft light merino knit and can be personalised as I have done with a message stamped around the rim (hard to see in this crappy photo) or a small piece of fabric sewn on. Whatever you fancy.

The one Hugo is modeling was made for a child and is slightly smaller (exactly to the pattern actually). For adult sizes I have treated the pattern as if it needs seam allowances added. That has given it enough room for the adult head. Hugo's head is 19", Georgia's is 20" and mine is 23" to give you some idea. I fit the adult one snuggly. It should be a snug fit. But perhaps for chemo caps, given the patient may have had head surgery (as my aunty has done) a looser fit would be nicer.

Monday, February 14, 2011

sew the list grows on

I have a new sewing station. Everyone including me grew sick of having our dining table taken up with sewing machines and fabric and other associated items.
Back from the garage came our previous dining table, the fabulous formica! All I need now is some storage beneath it for the fabric-a-brac.


Adding to the chemo hats will be this versatile cardigan and top. It is apparently a rip-off pattern of a popular DKNY garment that can be worn in about 15 different ways.

I shopped for this fabric last week at the Global Fabrics sale. Pinks for my aunty, blues for me. Fine stretch cottons and slippery silks. I hope I bought enough fabric!

Adding this to my fabric stash, a mountain of other sewing projects either on the go or in the pipeline... I don't know. I seem to bit off more than I can chew sometimes.

But anyway, this is first on the list now. The kids will have to wait for their new merino garments for the winter.

Sunday, February 6, 2011

chemotherapy hats or chemo caps

Please excuse my time away from the computer. I have had a week preparing for a friend's wedding then a week recuperating from the wedding. But I have been making things, so I have lots to share soon.

Cancer has been on my mind a lot lately. The awful but necessary process of enduring chemotherapy and radiation treatments, which not only cause one to lose their hair, but to feel unwell too, and for it to be no guarantee of survival or even prolonging life either - it is no wonder people have come up with many designs for a 'chemo cap'. They cover, cheer, provide dignity and even laughter.

Someone close to me is in need of some new ones so last night I got busy with my sewing machine, fabric stash and a new overlocker! Well, 1986 new, from Mum's forgotten cupboard to the fix-it man and $90 later I have a working one. Oh how long I have waited...


Sorry I couldn't get better photos or a better model!

 frontwards,

 backwards,
and inside out...

The front and back views: This one made from an old t-shirt.

They were all made in a slightly stretchy knit (jersey) and in cotton, apart from the bright pink which is a cotton blend sweater fabric, probably too thick for a summer hat but it was the prototype (first made).


There are lots of free patterns available for these. I chose this turban design because it's similar to what she's already been wearing. They really are easy to sew but have a glamorous look when finished.

I made four of them in a night, taking approximately 15 minutes each. The pattern provides no photos so I thought I'd share some here if anyone is interested in making these for someone they love, or even for charity. They reckon a person needs three: one to wear, one to wash and a spare. I reckon my aunty needs one for every day of the week or even every outfit. If it makes her feel even slightly better to have a hat to match an outfit it's worth making.

The other requirement was bright colours, like gemstones. The last one I made (not photographed) was pink with orange gemstones sewn on the band at the front. It could be decorated with any other feature, like a brooch or false flower... Your choice!
I hope you can brighten someone's day too with one of these.

Tuesday, December 7, 2010

Horner pants


Hugo has some Horner pants. Made from this lovely pattern in Anna Maria Horner's book, Handmade Beginnings, it was very easy and a good way to use some favourite fabric scraps on a garment.
I had the grey cord fabric from years ago, it was an off-cut and luckily the pattern calls for a shorter piece to be used on the back where the yoke is made from another fabric, so I had just enough of the grey, and just enough of the brown tulips (which I have used before for Hugo pants and it was originally a strange, Asian-label, female shirt!
The size is 24 months. Hugo is nearly 2 and a half and they have some length to grow in, so I'm pretty pleased.

I didn't line them and make them reversible, simply because it's summer and the fabrics were already pretty thick and warm. So I finished with a folded over hem and a waistband made the same way. This actually took off another couple of cm of length, so again, very pleased they fit with some growing room - I was taking a gamble...

Hope to make more of these, so easy and I love the idea of making reversible pants for grubby babies.
And this size will fit Hugo for another year I'd say, and I could easily add some length if he grows longways, as I'm pretty sure the bum of the pants has room for a nappy, which he doesn't wear.

Friday, October 29, 2010

Rag quilt


Phew, done. This beautiful 'rag quilt' for Hugo.
Easy as, simply cut squares of fabric, either two or three layers depending on thickness, I was told a layer of cotton, flannel in between, and cotton again on the back is recommended. Don't use stretch fabrics, I tried some stretch merino wool and it was a mess, the quick-unpick ripped out some tangled seams.
Quilt with an X.  


then stitch together in your desired pattern. I found it easiest to complete rows first, then sew rows together. If the corners were too thick (or not matching up as well as you'd like) I suggest doing what I did sometimes - stitching square by square, reinforcing seams with backstitching. Otherwise, if things were looking good I'd lay the top seam facing forward and the underneath seam facing backward and push it through the machine. The fabric caught by this needs to be snipped out to freely fray, if you get what I mean...

 Now down to business. Trim the sides into fraying notches. If you have spring-loaded scissors, use them now. I didn't, and it wasn't bad at all using regular sewing scissors (they must be sharp though).
Throw into the washing machine, then the clothes dryer (regular cycles).
The more you wash the greater it looks (more frayed).
[with flash]

[without flash]


Some details:
Fabric is by Heather Bailey, her Nicey Jane line. The lime green with birds and flowers is by Patty Young for Michael Miller (Hummingbirds in Lime, some available here on NZ site trademe). Love these fabrics, the colours are sorta juicy, edible, and they go so well with the walls. Tried to choose boy colours, but young boy colours and they had to please me and Georgia too (who shares a room with him).
The size is for standard (American) cot size, 1300mm long. The squares are 20cm with 1.5cm (1/2 inch) seam allowance. I used 48 squares (8x6), so used 5 colours, 40cm (1/2 yard) each with one colour using only 8 squares while the rest used 10.


The backing is some micro-fleece I bought to make Hugo a dressing gown. The grandies bought him one so I didn't need to make one. I had nearly enough, so made up the rest of the squares withe some vintage blue felted wool and I cut up a yellow baby's sleeping bag I didn't use. I laid them using a quick sketch plan of colours, randomly placed with an attempt to have one colour each row somewhere. Didn't look at the back, but I knew it would work out ok because the fronts were planned and mainly used just one colour for each different coloured backing fabric. But really, was just random.


Can you believe I almost cut up this  cutie little vintage yellow baby's coat? I didn't use it for Georgia and it's been stored away since, but actually I think Adelaide will be the right size for it next winter. So glad I kept it.


The thread is this Metler poly sheen multi, 100% polyester, Japan made, no.40 - and it changes from blue to gold to brown as you go. It added interest and something special to the handmade appeal of making your own quilt. If nobody else notices it, at least I'm glad I used it.
Apparently these quilts are popular at the moment. I can see why. They look snuggly, they ARE snuggly! They are beautiful, they show off your favourite fabrics. Quick and easy to make (mine took approx two mornings plus cutting time) and they are a good introduction to quilting. You can use a regular sewing machine, and you don't need to quilt the thing in its entirety, just square by square.
This is my first quilt. I think I'll be making more of these, in girl colours. I can't wait!

Thursday, October 28, 2010

Fabric coming out my ears

It's been stashed away in cupboards, drawers, and most recently the garage, for what seems like years. Actually, it has been years. I've dabbled in sewing over the last decade. When I was a teenager I sewed some gorgeous things. Some I made without patterns, others using ambitious vintage patterns. All this increased my sewing skills until I felt quite confident. Then my old 1950s machine broke and I never got a new one. Until last week. A 1987(?) Husqvarna Prisma. Just in need of a service, which it got, and also needs the zigzag function fixed (yet to happen, gonna cost a bit of $$).
I tipped out the fabric stash to air in the sun - here is about half the pile. I feel guilty and inspired.
Some of it is beautiful and some just functional. I have books by Lotta JansdotterAna-Maria Horner and various vintage patterns ready to go. All cut-out, and now I'm too blimmin tired to sew! Needless to say, watch this space.